
[1]:
# This information helps with debugging and getting support :)
import sys, platform
import pandas as pd
import bifacial_radiance as br
print("Working on a ", platform.system(), platform.release())
print("Python version ", sys.version)
print("Pandas version ", pd.__version__)
print("bifacial_radiance version ", br.__version__)
Working on a  Windows 10
Python version  3.11.8 | packaged by conda-forge | (main, Feb 16 2024, 20:40:50) [MSC v.1937 64 bit (AMD64)]
Pandas version  2.2.3
bifacial_radiance version  0.5.0b2.dev4+gedb973d.d20250924
20 - Racking I Beams#
This Journal shows how to model a site including I beams. While the I Beams can be added to the module unit, doing it for the whole row reduces the amount of geometries in the scene and makes raytracing faster.
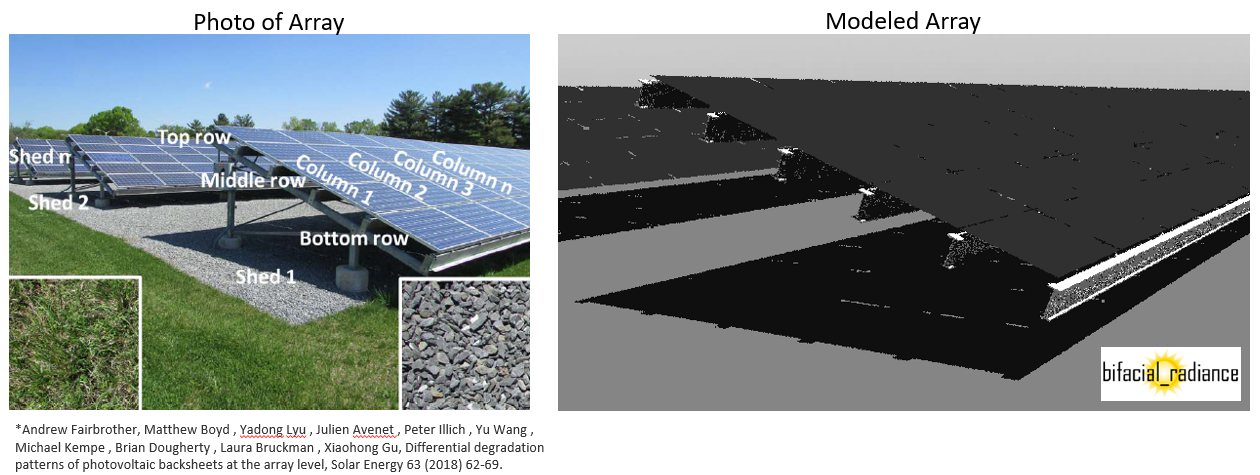
This particular geometry corresponds to the fixed tilt array in Bethesda, Maryland, studied for degradation in Andrew Fairbrother, Matthew Boyd , Yadong Lyu , Julien Avenet , Peter Illich , Yu Wang , Michael Kempe , Brian Dougherty , Laura Bruckman , Xiaohong Gu, Differential degradation patterns of photovoltaic backsheets at the array level, Solar Energy 63 (2018) 62-69.
It is a 5 row, 5-up landscape site (except for the last row which is 4-up, but we are not modeling that here). There are 48 5-up collectors or ‘columns’ (as bifacial_radiacne and the journal calls them, respectively). Tilt is 20 degrees, ground clearance is 0.9m.
[2]:
import os
from pathlib import Path

testfolder = Path().resolve().parent.parent / 'bifacial_radiance' / 'TEMP' / 'Tutorial_20'
if not os.path.exists(testfolder):
    os.makedirs(testfolder)

# Another option using relative address; for some operative systems you might need '/' instead of '\'
# testfolder = os.path.abspath(r'..\..\bifacial_radiance\TEMP')

print ("Your simulation will be stored in %s" % testfolder)
Your simulation will be stored in C:\Users\cdeline\Documents\Python Scripts\Bifacial_Radiance\bifacial_radiance\TEMP\Tutorial_20
[3]:
import bifacial_radiance as br
import numpy as np

br.__version__
[3]:
'0.5.0b2.dev4+gedb973d.d20250924'
[4]:
radObj = br.RadianceObj('tutorial_20', path=str(testfolder))
epwfile = radObj.getEPW(lat = 37.5, lon = -77.6)  # This location corresponds to Richmond, VA.
radObj.readWeatherFile(epwfile)
radObj.setGround(0.14)
radObj.gendaylit(2819)
path = C:\Users\cdeline\Documents\Python Scripts\Bifacial_Radiance\bifacial_radiance\TEMP\Tutorial_20
Making path: images
Making path: objects
Making path: results
Making path: skies
Making path: EPWs
Making path: materials
Getting weather file: USA_VA_Richmond.724010_TMY2.epw
 ... OK!
8760 line in WeatherFile. Assuming this is a standard hourly WeatherFile for the year for purposes of saving Gencumulativesky temporary weather files in EPW folder.
Coercing year to 2021
Saving file EPWs\metdata_temp.csv, # points: 8760
Calculating Sun position for Metdata that is right-labeled  with a delta of -30 mins. i.e. 12 is 11:30 sunpos
Loading albedo, 1 value(s), 0.140 avg
1 nonzero albedo values.
[4]:
'skies\\sky2_37.5_-77.33_2021-07-29_1200.rad'
[5]:
moduletype='test-module' # Data sizes below are for 'Sharp_NU-U235F2'
x=1.64
y=0.994
xgap = 0.046
zgap = 0
ygap = 0
numpanels=5

NIST_Collector = radObj.makeModule(name=moduletype,x=x, y=y, numpanels=numpanels,
                                   xgap=xgap, ygap = ygap, zgap=zgap)
Module Name: test-module
Module test-module updated in module.json
[6]:
sceneDict = {'tilt':20, 'pitch':9.4488, 'clearance_height':0.9,
                         'azimuth':180, 'nMods':48, 'nRows':5}

sceneObj = radObj.makeScene(NIST_Collector, sceneDict=sceneDict)
Adding the I-Beams#
HEre is where the magic happens. We will calculate the row length (number of modules times the collector x value plus the xgaps between), and we will also calculate the spacing between the beams accross the collector width so that the beas are placed at the start of the colectro and then between each module, just like in the image (5 modules = 6 Beams then)
[7]:
beam_count = 6
beam_mat = 'Metal_Grey'
beam_len = sceneDict['nMods']*NIST_Collector.x + (sceneDict['nMods']-1)*NIST_Collector.xgap
beam_len = round(beam_len,0)
beam_ydist = np.linspace(NIST_Collector.sceney/2,0-NIST_Collector.sceney/2,6)

# by photograph approximation
beam_cap = {'len':beam_len, 'height':0.02, 'width':0.12}
beam_ctr = {'len':beam_len, 'height':0.30, 'width':0.02}

print(f'Beam Length: {beam_len} meters')
print(f'Vertical Distribution: {beam_ydist}')
Beam Length: 81.0 meters
Vertical Distribution: [ 2.485  1.491  0.497 -0.497 -1.491 -2.485]
We will use makeCustomObject like in previous journal examples and appendtoScene the IBeams.
Note that the IBeams geometry is being generated:
Generate the geometry (genbox)
Translate the beam so that the center of the world (0,0,0) is positioned at the beam’s center
Tilt by the angle of the array,
Then move to the correct clearance height and position accross the collector width calculated above.
[8]:
rows = sceneDict['nRows']
offsetMultiplier = np.linspace(-(rows//2),(rows//2),rows)
for row in range(0,sceneDict['nRows']):
    offset = offsetMultiplier[row]*sceneDict['pitch']
    customObjects = []
    for pos in beam_ydist:
        count = list(beam_ydist).index(pos)
        name = f'BEAM_r{row}_c{count}'
        ydisp = pos * np.cos(sceneDict['tilt']*np.pi/180.0) + offset
        zdisp = np.sin(sceneDict['tilt']*np.pi/180.0) * (pos-beam_ydist[-1]) + sceneDict['clearance_height'] - .05
        text = '! genbox {} beamTop{} {} {} {} | xform -t {} {} 0 | xform -rx {} | xform -t 0 {} {}'.format(
                                                beam_mat, count,
                                                beam_cap['len'], beam_cap['width'], beam_cap['height'],
                                                -beam_cap['len']/2+.8, -beam_cap['width']/2,
                                                sceneDict['tilt'],
                                                ydisp, zdisp)

        text+= '\r\n! genbox {} beamBot{} {} {} {} | xform -t {} {} 0 | xform -rx {} | xform -t 0 {} {}'.format(
                                                beam_mat, count,
                                                beam_cap['len'], beam_cap['width'], beam_cap['height'],
                                                -beam_cap['len']/2+.8, -beam_cap['width']/2,
                                                sceneDict['tilt'],
                                                ydisp + beam_ctr['height']*np.cos(np.pi/2 - np.pi*sceneDict['tilt']/180.0), zdisp - beam_ctr['height'])

        text+= '\r\n! genbox {} beamCtr{} {} {} {} | xform -t {} {} {} | xform -rx {} | xform -t 0 {} {}'.format(
                                                beam_mat, count,
                                                beam_ctr['len'], beam_ctr['width'], beam_ctr['height'],
                                                -beam_ctr['len']/2+.8, -beam_ctr['width']/2, beam_cap['height'],
                                                sceneDict['tilt'],
                                                ydisp + beam_ctr['height']*np.cos(np.pi/2 - np.pi*sceneDict['tilt']/180.0), zdisp - beam_ctr['height'])
        customObj = radObj.makeCustomObject(name,text)
        customObjects.append(customObj)
        sceneObj.appendtoScene(customObject=customObj)
Custom Object Name objects\BEAM_r0_c0.rad

Custom Object Name objects\BEAM_r0_c1.rad

Custom Object Name objects\BEAM_r0_c2.rad

Custom Object Name objects\BEAM_r0_c3.rad

Custom Object Name objects\BEAM_r0_c4.rad

Custom Object Name objects\BEAM_r0_c5.rad

Custom Object Name objects\BEAM_r1_c0.rad

Custom Object Name objects\BEAM_r1_c1.rad

Custom Object Name objects\BEAM_r1_c2.rad

Custom Object Name objects\BEAM_r1_c3.rad

Custom Object Name objects\BEAM_r1_c4.rad

Custom Object Name objects\BEAM_r1_c5.rad

Custom Object Name objects\BEAM_r2_c0.rad

Custom Object Name objects\BEAM_r2_c1.rad

Custom Object Name objects\BEAM_r2_c2.rad

Custom Object Name objects\BEAM_r2_c3.rad

Custom Object Name objects\BEAM_r2_c4.rad

Custom Object Name objects\BEAM_r2_c5.rad

Custom Object Name objects\BEAM_r3_c0.rad

Custom Object Name objects\BEAM_r3_c1.rad

Custom Object Name objects\BEAM_r3_c2.rad

Custom Object Name objects\BEAM_r3_c3.rad

Custom Object Name objects\BEAM_r3_c4.rad

Custom Object Name objects\BEAM_r3_c5.rad

Custom Object Name objects\BEAM_r4_c0.rad

Custom Object Name objects\BEAM_r4_c1.rad

Custom Object Name objects\BEAM_r4_c2.rad

Custom Object Name objects\BEAM_r4_c3.rad

Custom Object Name objects\BEAM_r4_c4.rad

Custom Object Name objects\BEAM_r4_c5.rad
[9]:
radObj.makeOct()
Created tutorial_20.oct
[9]:
'tutorial_20.oct'
View your geometry#
You can view your geometry by uncommenting the line below (or copy-pasting it into a terminal after you navigate to the folder that contains your simulation)
[10]:
#!rvu -vf views\front.vp -e .01 -vp -49 -10 0.9 -vd 0.6879 0.7119 -0.1411 IBeam.oct